

A soft sweater can turn ordinary wrapping paper into a lumpy, sagging parcel. The paper has nothing rigid to fold against, the sleeves create uneven pressure, and extra tape rarely fixes the shape. You do not need a gift box, though. A thin cardboard base and a snug tissue-paper layer give the sweater enough structure for clean seams and crisp-looking ends.
This method works for most adult pullovers, cardigans, sweatshirts, and folded pajamas. The example begins with a sweater folded to roughly 10 × 13 inches and 2–3 inches thick. The finished parcel is about 11 × 14 inches, depending on the knit. Allow 10–15 minutes once your materials are ready.
Why Soft Gifts Look Lumpy
Wrapping paper behaves best around a firm rectangle. A folded sweater is soft, so its edges move while you pull the paper and its trapped air shifts toward the ends. The cardboard base stops the parcel from bending. The tissue layer contains loose sleeves and gives the outer paper a smoother surface.
The goal is support, not compression. Do not flatten a delicate knit, crush raised embellishments, or tighten ribbon until it dents the garment. If the sweater has beads, sequins, a structured collar, or a bulky hood, use a proper box or reusable gift bag instead.
Materials
- One clean, dry sweater
- Two sheets of tissue paper, approximately 20 × 30 inches each
- One piece of clean, thin chipboard or recycled cereal-box board
- One sheet of medium-weight wrapping paper; approximately 22 × 28 inches suits a 10 × 13 × 2.5-inch bundle
- Transparent tape
- Scissors
- About 2 yards of 1-inch ribbon
- One gift tag
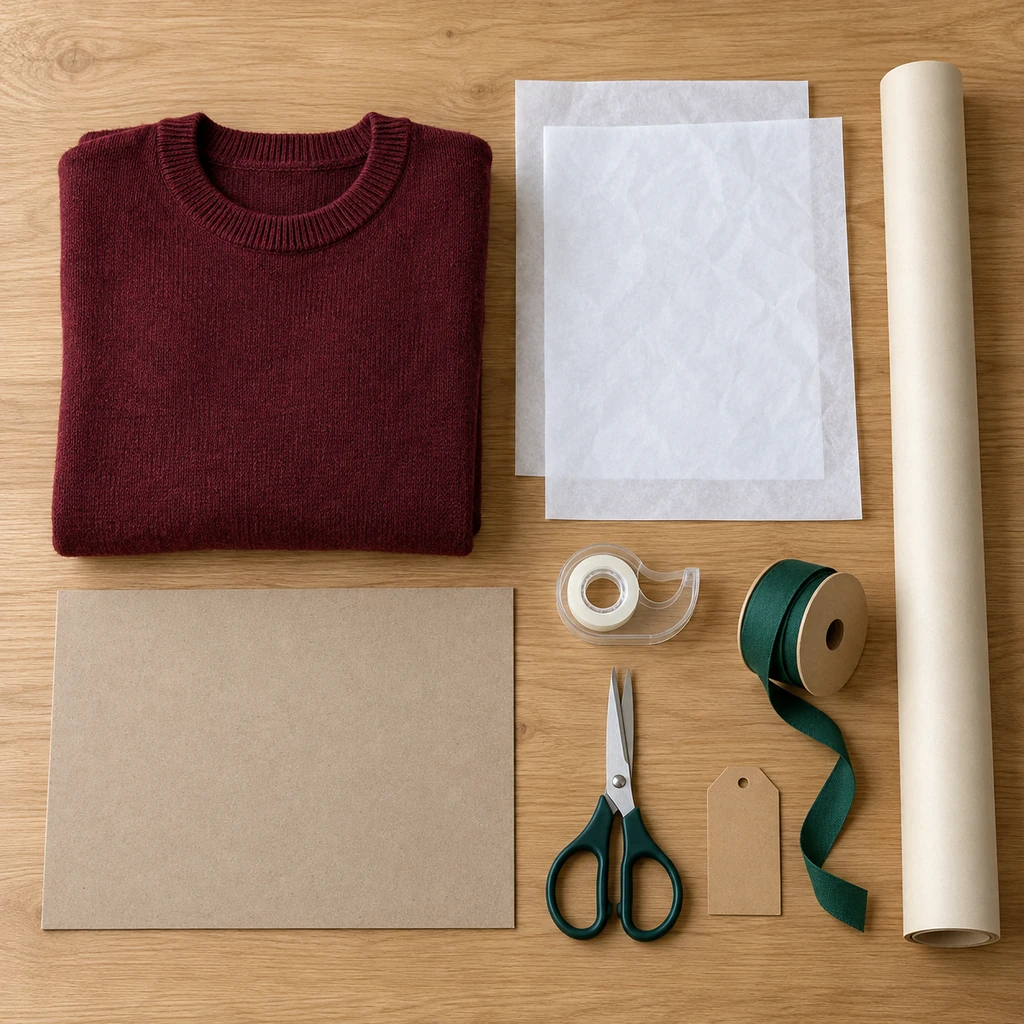
Use smooth, medium-weight paper. Very thin paper reveals every ridge; very stiff paper fights the soft corners and can split at the folds. Chipboard should be clean, odor-free, and free of sharp staples or rough cut edges.
Step-by-Step Instructions
1. Fold the Sweater Into an Even Rectangle
Fasten buttons or the zipper, then lay the sweater face down. Cross the sleeves flat across the back instead of bunching them at the center. Fold both sides inward until the body is about 10 inches wide, then bring the hem up toward the shoulders. Adjust the fold until the thickness feels even from corner to corner.
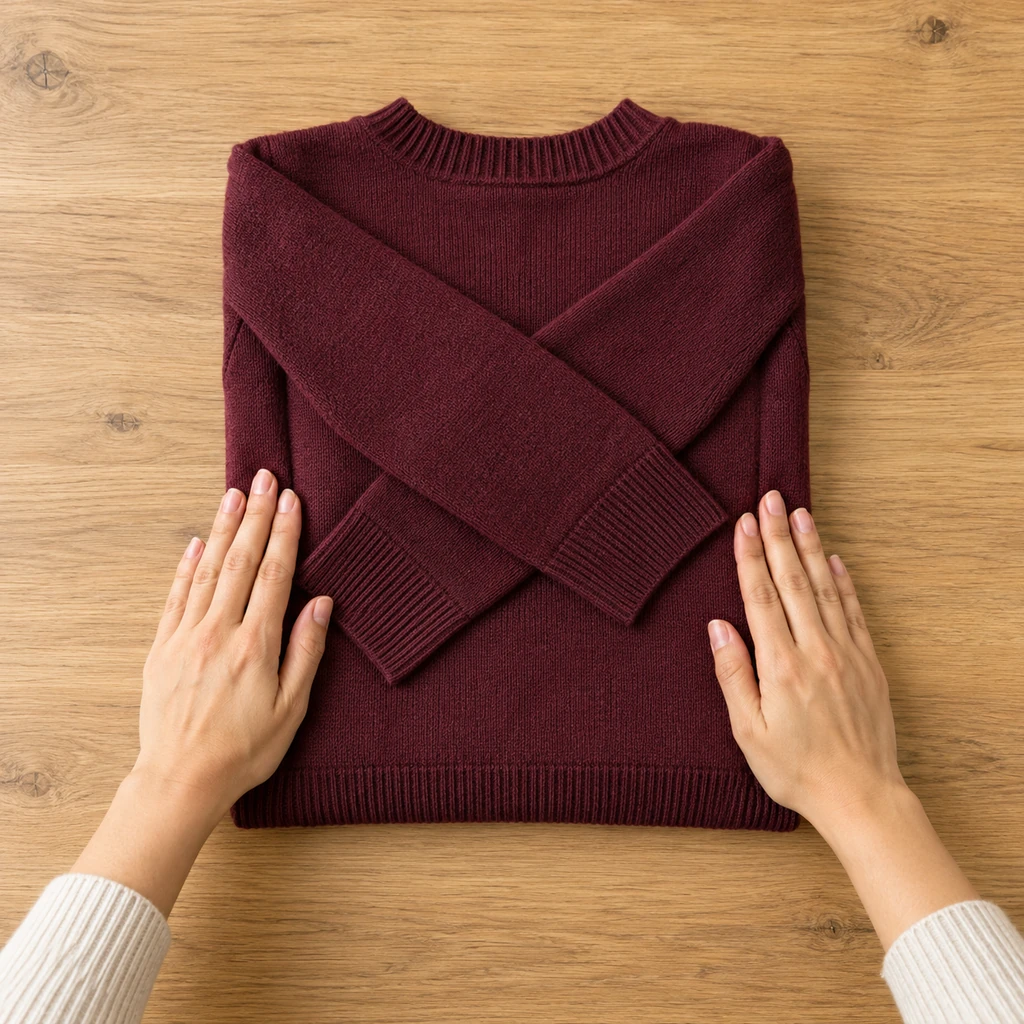
Do not force every garment to the same measurement. A chunky sweater may finish wider than a fine-knit pullover. What matters is a balanced rectangle without a thick sleeve knot under one side.
2. Cut the Cardboard Base to Match
Place the folded sweater on the chipboard and mark the footprint. Cut the board about 1/4 inch smaller on every side so it supports the knit without showing through the outer paper. Round any sharp corners slightly with the scissors. Brush away cardboard dust before returning the sweater to the base.
For the photographed 10 × 13-inch sweater, the base is approximately 9.5 × 12.5 inches. Keep the cardboard beneath the sweater; adding a second board on top can make the gift feel like a rigid package and may press texture into the knit.
3. Make a Snug Tissue-Paper Inner Parcel
Cross two tissue sheets on the table and place the cardboard-backed sweater in the center. Fold the lower sheet over the long sides, then close the second sheet over the short sides. Use one or two small tape tabs on tissue only. Smooth the package with open palms, pressing out excess air without crushing the garment.
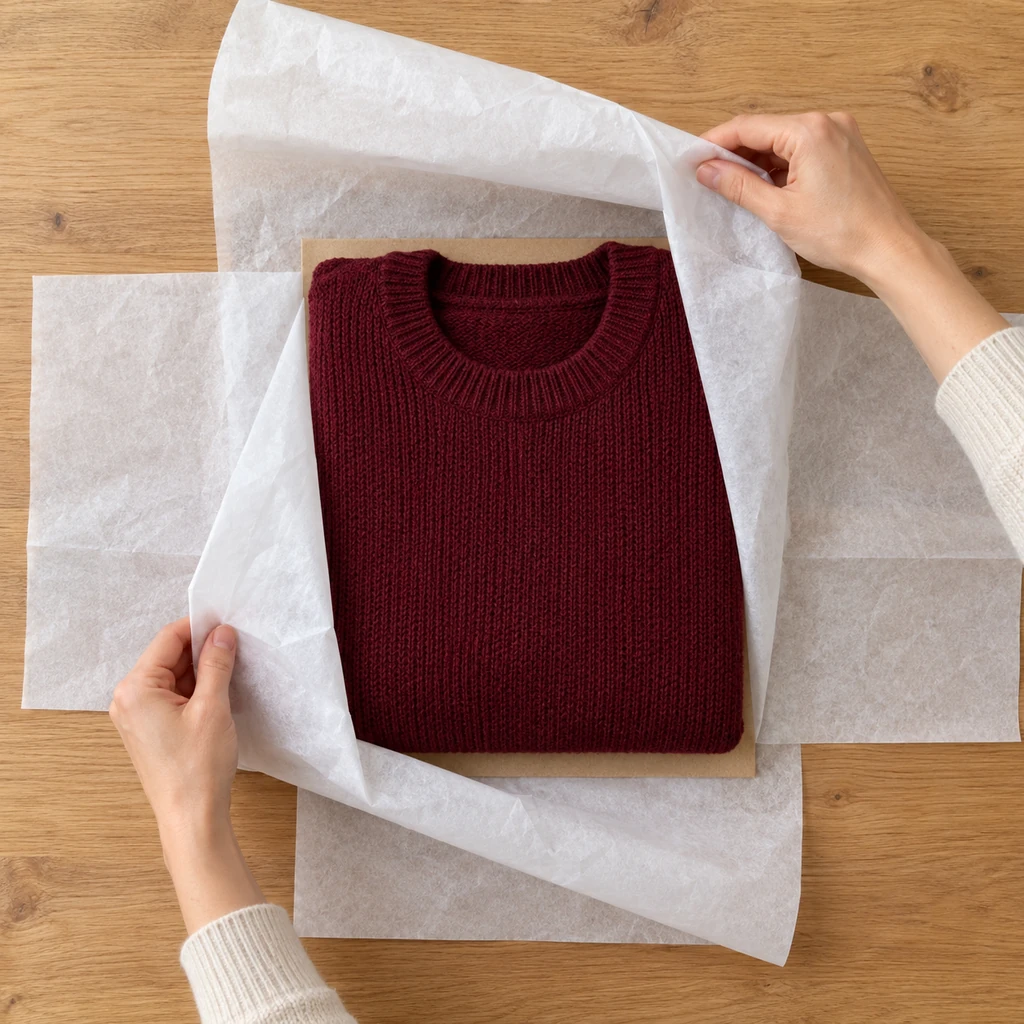
Turn the inner parcel over once. If it bends dramatically or one corner collapses, reopen the tissue and correct the sweater fold now. The outer paper cannot hide a poorly balanced inner bundle.
4. Size and Position the Wrapping Paper
Roll out the wrapping paper with its decorative side facing the table. Place the tissue parcel face down in the center. Bring the two long edges toward the middle; they should overlap by about 2 inches. At each short end, the paper should reach slightly beyond the parcel’s full thickness so the flaps can meet without a gap.
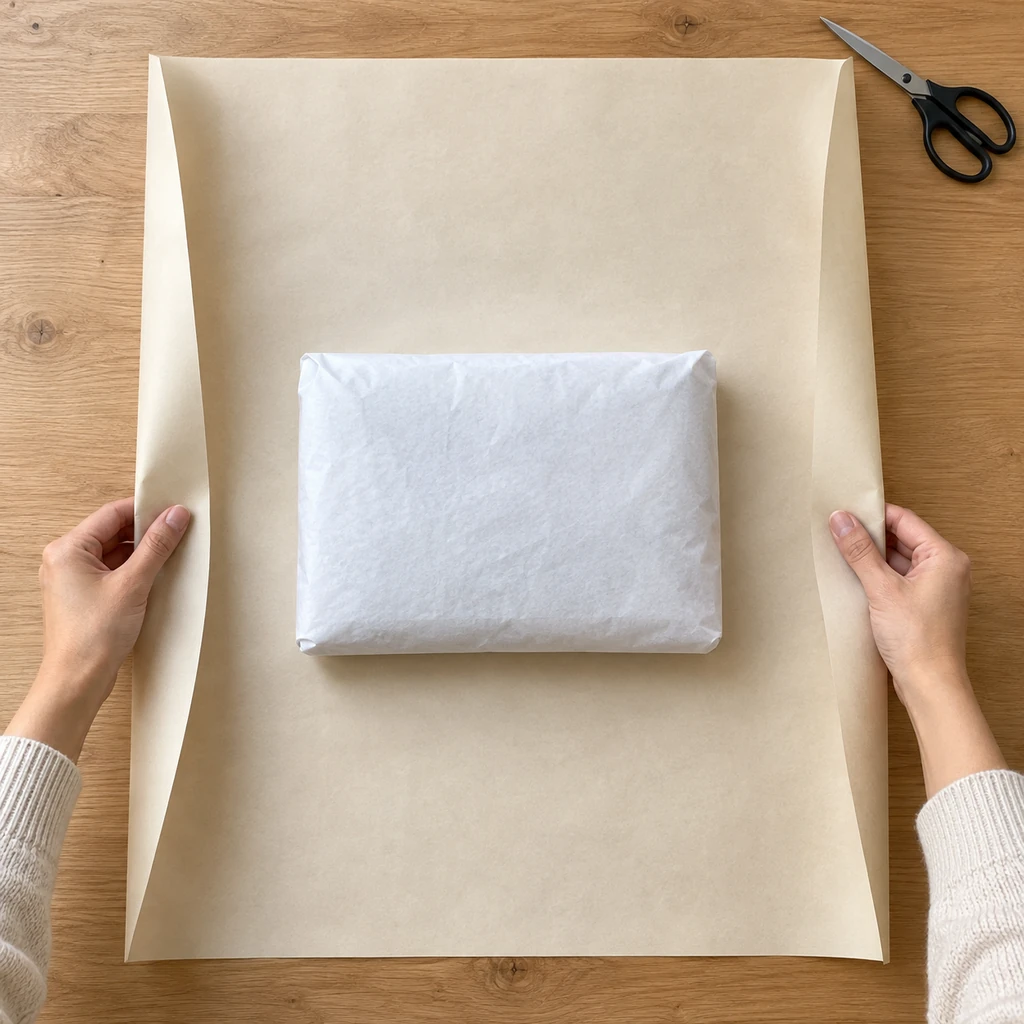
Trim excess before taping. Too much paper makes bulky end folds; too little creates exposed tissue. For a 10 × 13 × 2.5-inch parcel, start with roughly 22 × 28 inches and reduce only after checking the overlap.
5. Close the Long Seam Without Crushing the Knit
Bring one long edge over the parcel and hold it in place. Pull the opposite edge snugly across it, keeping the paper flat rather than stretching it downward. Tape the 2-inch overlap at the center, then add one small tape tab near each end of the seam if needed.
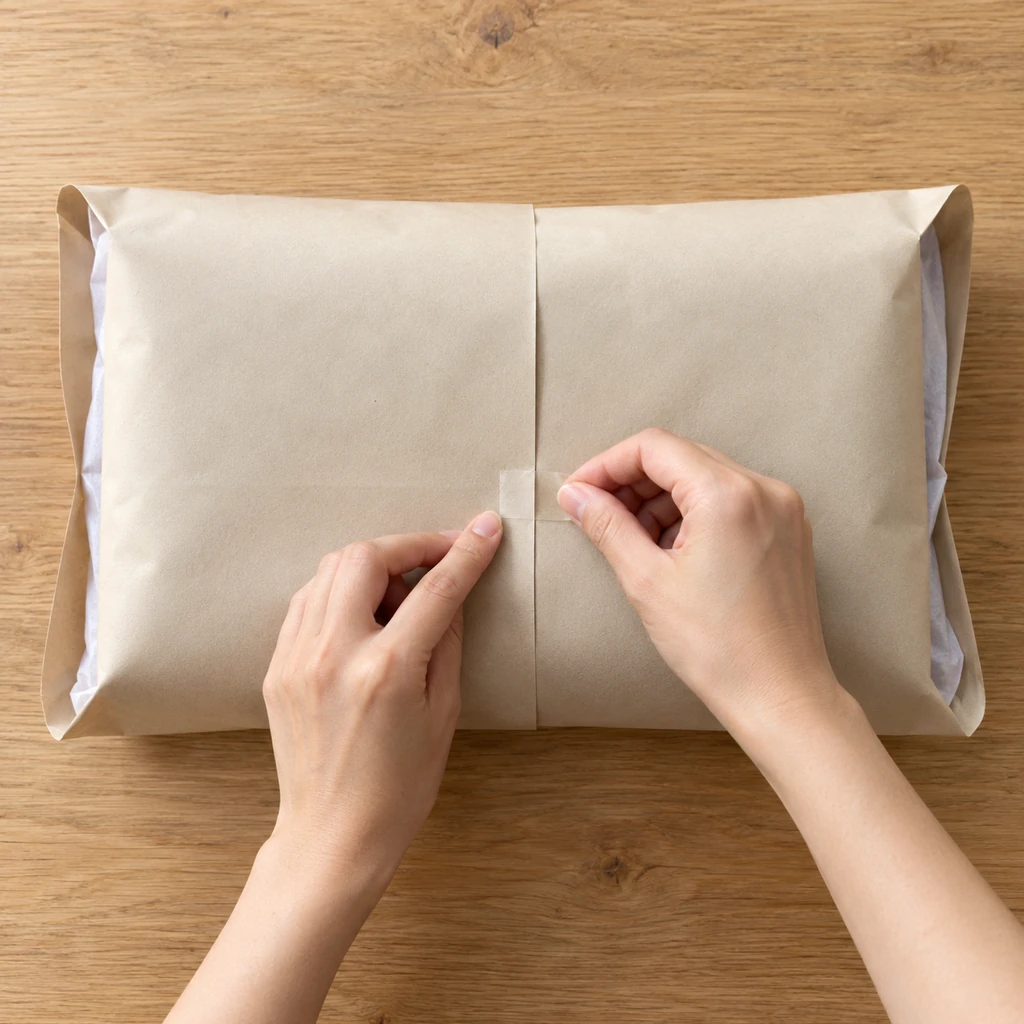
Slide your palm across the top. The surface should feel supported but still slightly soft. If the paper bows sharply inward, loosen the seam; if it ripples, retape it with firmer, even tension.
6. Form Crisp Short Ends
Work on one short end at a time. Push the left and right sides inward until two triangular flaps form. Crease the diagonals gently against the cardboard-supported edge. Fold the lower flap up, then bring the upper flap down over it and secure it with tape. Repeat at the other end.
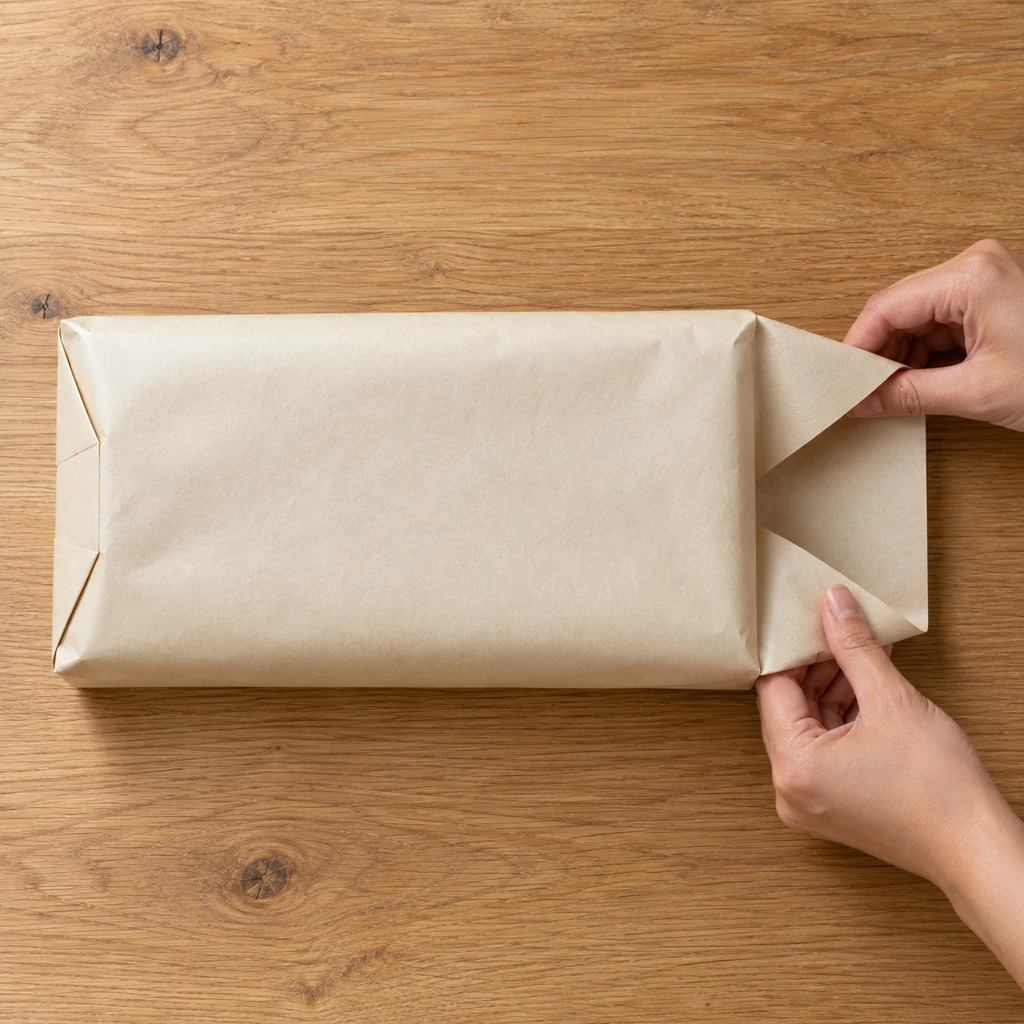
Do not press the crease with a fingernail directly over soft knit. Pinch only the paper beyond the parcel edge. If an end flap is much longer than half the parcel thickness, trim it before taping so it does not create a visible lump.
7. Add Ribbon and a Tag
Turn the parcel seam-side down. Center the ribbon under the gift, cross it over the top, rotate the parcel or ribbon 90 degrees, and tie a flat bow. Thread on the tag before tightening the final knot. The ribbon should stay in place without cutting into the paper.

Keep the decoration light. Heavy ornaments can pull against the soft parcel and tear the paper. One ribbon and one tag make the rectangular shape look intentional.
How to Adapt the Paper Size
Measure the folded parcel after the tissue layer is closed. For the paper dimension that wraps around the parcel, add twice the width, twice the thickness, and 2 inches for overlap. For the other dimension, use the parcel length plus twice the thickness plus approximately 4 inches for comfortable end folds.
These figures are starting points because paper stiffness and garment bulk change how much material the ends need. Always dry-fit the sheet around the actual parcel before cutting.
Common Problems and Fixes
The Paper Sags Across the Top
The sweater may contain trapped air or the center seam may be loose. Reopen the inner parcel, smooth the knit, and fold the tissue more snugly. Retape the outer seam with even tension rather than adding tape over the sag.
One End Looks Larger Than the Other
A sleeve or collar is probably concentrated on one side. Return to the first fold and distribute the garment thickness evenly. Matching paper flaps cannot correct an uneven sweater bundle.
The Corners Keep Rounding
Check that the cardboard reaches close to all four edges of the folded sweater. A base that is much too small cannot support the corners. It should be about 1/4 inch smaller per side, not several inches smaller.
The Paper Tears at the Ends
The paper may be too short, too thin, or pulled too tightly. Replace it rather than covering a structural tear with tape. Use a slightly larger sheet and make the diagonal creases outside the sweater edge.
Which Soft Gifts Work With This Method?
- Good choices: pullovers, cardigans, sweatshirts, pajamas, scarves folded into a stack, and soft robes without bulky belts.
- Use extra tissue: slippery satin pajamas or garments with loose straps.
- Use a box instead: beaded knits, structured jackets, brimmed hats, shoes, fragile accessories, or clothing with security tags still attached.
- For travel or mailing: place the wrapped gift inside a protective shipping carton; wrapping paper is not a shipping container.
More Practical Gift-Wrapping Ideas
Keep the rest of your supplies visible with the five-zone gift-wrap storage system. If you would rather avoid paper entirely, make reusable gift bags from old pillowcases. For a coordinated holiday setting, the small-entryway Christmas decorating guide keeps the doorway clear while still creating a festive welcome.
Frequently Asked Questions
Can I wrap a sweater without tissue paper?
Yes, but tissue keeps sleeves contained and prevents the outer paper from catching on buttons or knit texture. If you skip it, use smooth paper and make sure every garment edge is tucked securely.
Can I use corrugated cardboard?
Thin, clean corrugated cardboard can work for a heavy sweatshirt, but its ridges may show through light paper. Chipboard or a flattened cereal box creates a smoother base for most sweaters.
Will the cardboard make the recipient think there is a box?
The base adds support only beneath the garment, so the parcel still feels slightly soft. Its purpose is to keep the gift from folding in half while you make the seams.
How do I wrap a very chunky sweater?
Fold it wider rather than compressing it into a small, tall bundle. Use larger tissue and wrapping-paper sheets, and consider a box if the finished thickness exceeds about 4 inches or the ends will not close without force.
Can I prepare the gift several days early?
Yes. Store it flat in a dry place without stacking heavy gifts on top. Keep it away from radiators, damp floors, pets, and direct sun that could fade the paper or garment.