

A chunky yarn pumpkin wreath looks wonderfully soft on a wall, but the wrong wrapping method can leave it drooping after a few days. The reliable solution is simple: cover each wire separately, keep the yarn coils touching, and lock the lowest joints before adding any decorations.
This project uses a flat pumpkin-shaped wire wreath form rather than filling the open sections with loose woven rows. That distinction matters. Yarn wrapped directly around the metal cannot slide downward as one heavy sheet, so the finished pumpkin keeps its outline while still looking full and cozy.
What This Wreath Should Look Like
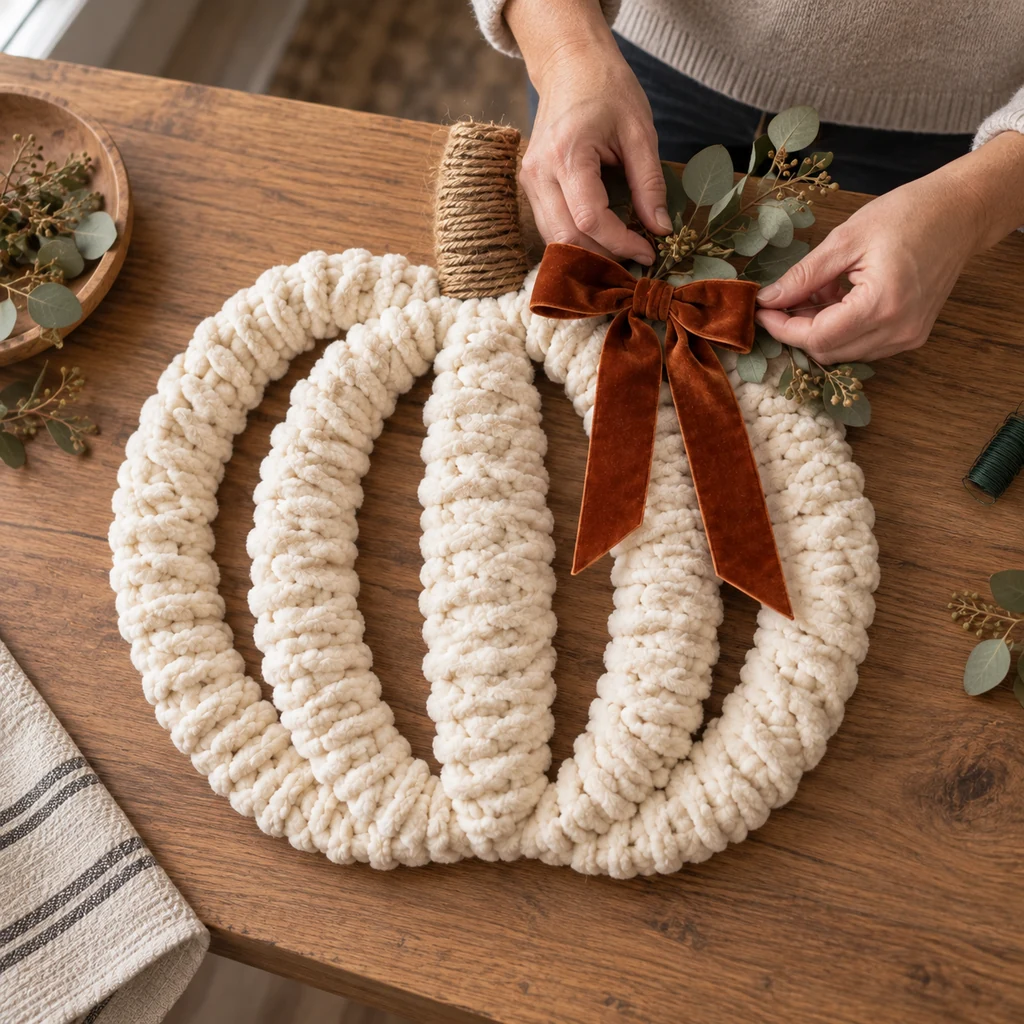
The finished wreath is approximately 18 inches wide, with a soft ivory body, a short jute-wrapped stem, and one restrained rust-colored bow. The dark wire disappears beneath the yarn, but the spaces between the curved ribs remain open. Those open sections make the pumpkin shape readable rather than looking like a solid oval.
Plan on 60 to 90 minutes for an 18-inch form. Your exact yarn use depends on the wire thickness and how tightly you pack the coils. Buy both skeins in the same dye lot if possible, then keep the receipt until the entire frame is covered.
Materials
- One flat, pumpkin-shaped wire wreath form, approximately 18 inches wide
- Two skeins of super-bulky ivory chenille yarn, approximately 25 to 35 yards total
- Natural jute twine for the stem
- Thin dark-green or brown floral wire
- Wire cutters and needle-nose pliers
- Four to six small rectangles of neutral felt
- About 30 inches of 1½-inch wired velvet ribbon
- Two small faux eucalyptus sprigs
- Scissors suitable for yarn and ribbon
Before buying yarn: take the frame with you or measure its total wire length. Plush chenille varies dramatically in thickness. A very thick strand covers faster but may crowd the narrow top and bottom junctions; a slightly slimmer super-bulky strand produces neater turns.
Step-by-Step Instructions
1. Inspect the Frame and Cover Sharp Points
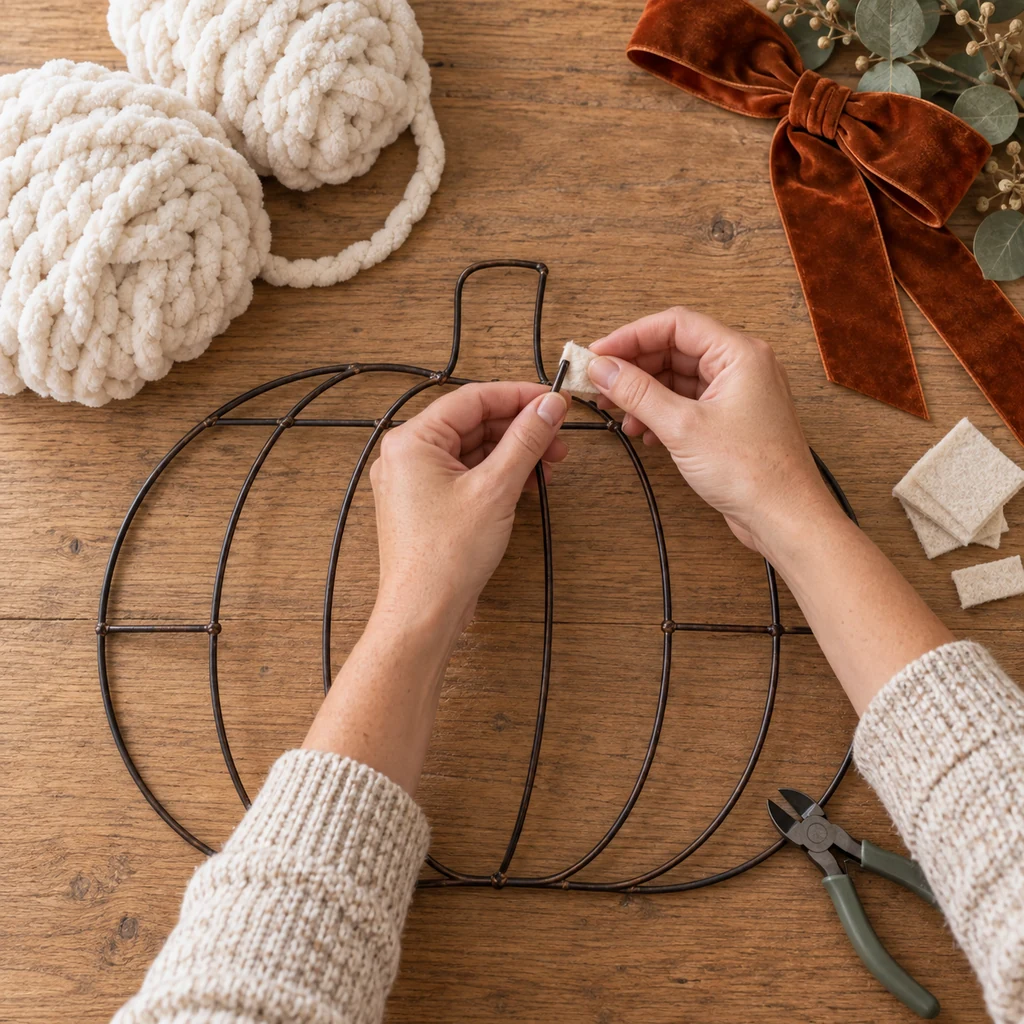
Lay the form flat and press gently at every welded joint. The frame should not rock, twist, or have a broken weld. Check cut ends and rough metal spots with your fingertips. Fold a small felt rectangle over each sharp point and bind it with a short piece of floral wire. Trim the wire closely and turn the cut end toward the back.
Do not skip this inspection because chenille can disguise a rough edge without removing it. A burr can eventually abrade the yarn or scratch the wall. Replace a frame with a loose structural weld rather than trying to make yarn hold the metal together.
2. Anchor the Yarn and Wrap the Outer Perimeter
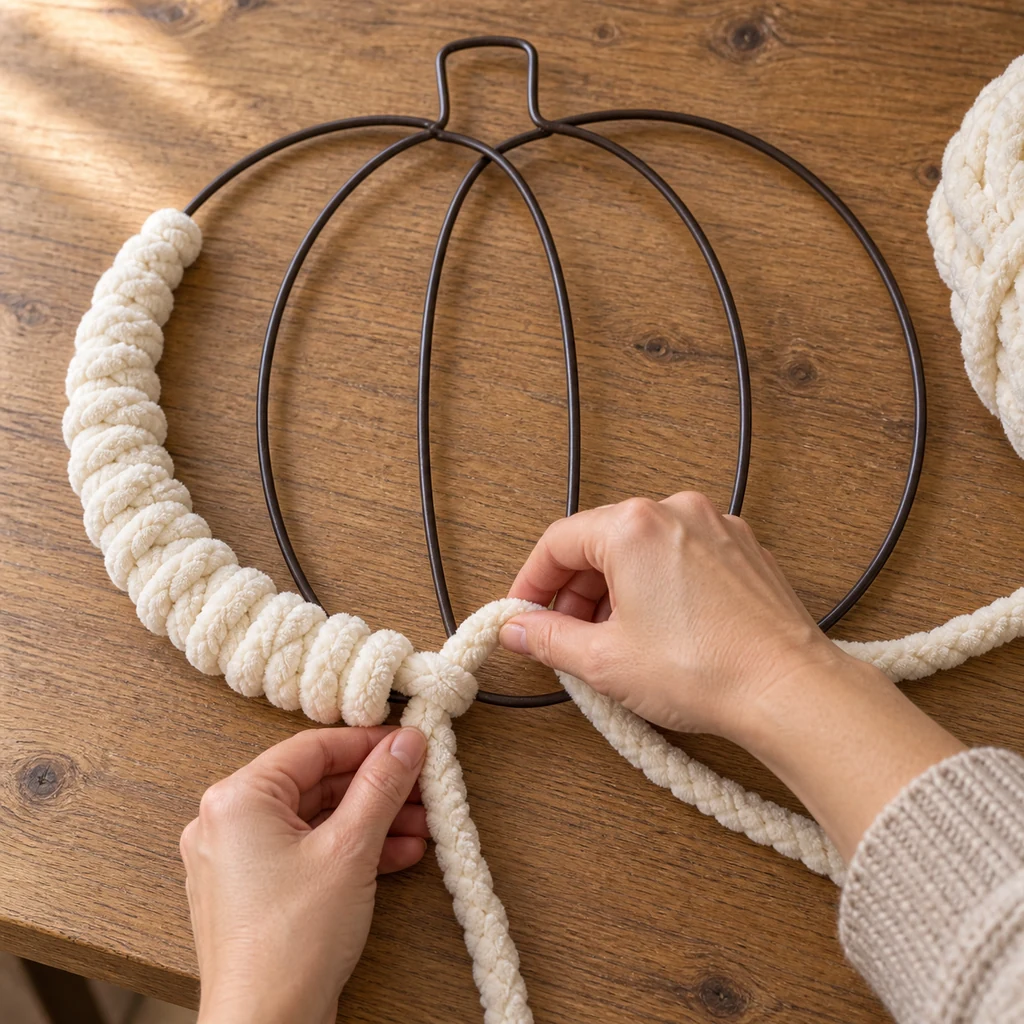
Tie the yarn to the back of the outer wire at the bottom center with a firm double knot, leaving a four-inch tail. Wrap the yarn around the metal in snug, adjacent coils. Slide each new coil against the previous one before making the next wrap. Work around the complete pumpkin outline, but stop at the rectangular stem.
Let the yarn pass through your fingers without stretching it. Pulling chenille hard can thin the strand, expose the dark wire, and create a wavy outline when the fibers relax. If a skein ends, join the new strand at the back with a square knot and tuck both tails beneath the next six wraps.
3. Wrap Each Interior Rib Separately
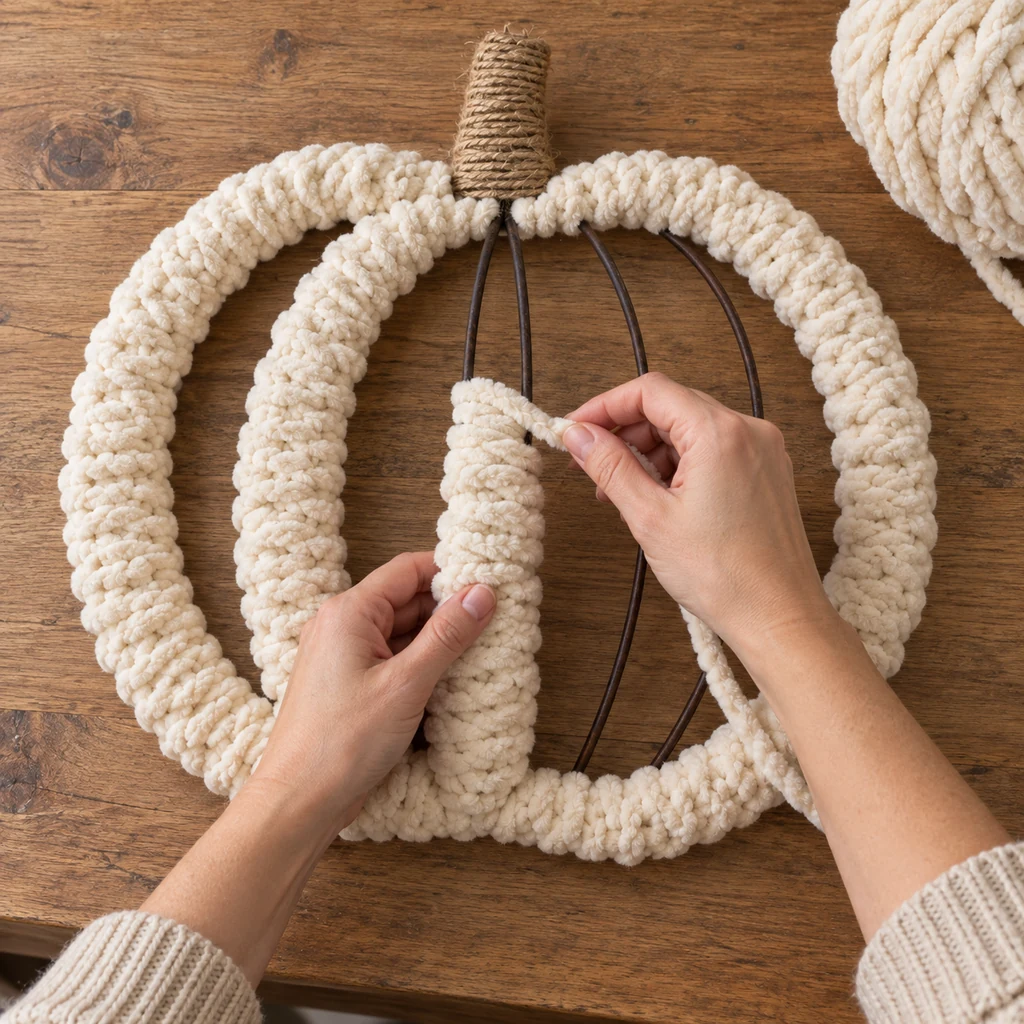
Return to the lower center and attach a fresh yarn length to the first interior rib. Wrap from bottom to top, packing the coils together as you go. Tie off at the back near the upper junction. Repeat on each curved rib instead of carrying loose yarn across an open section.
Pause after every few inches and view the frame from arm’s length. The wrap should be equally full along all the ribs. If one area looks thin, push neighboring coils toward the gap; do not wind a random second layer over the front because that creates visible lumps.
4. Lock the Bottom Joints Against Slipping
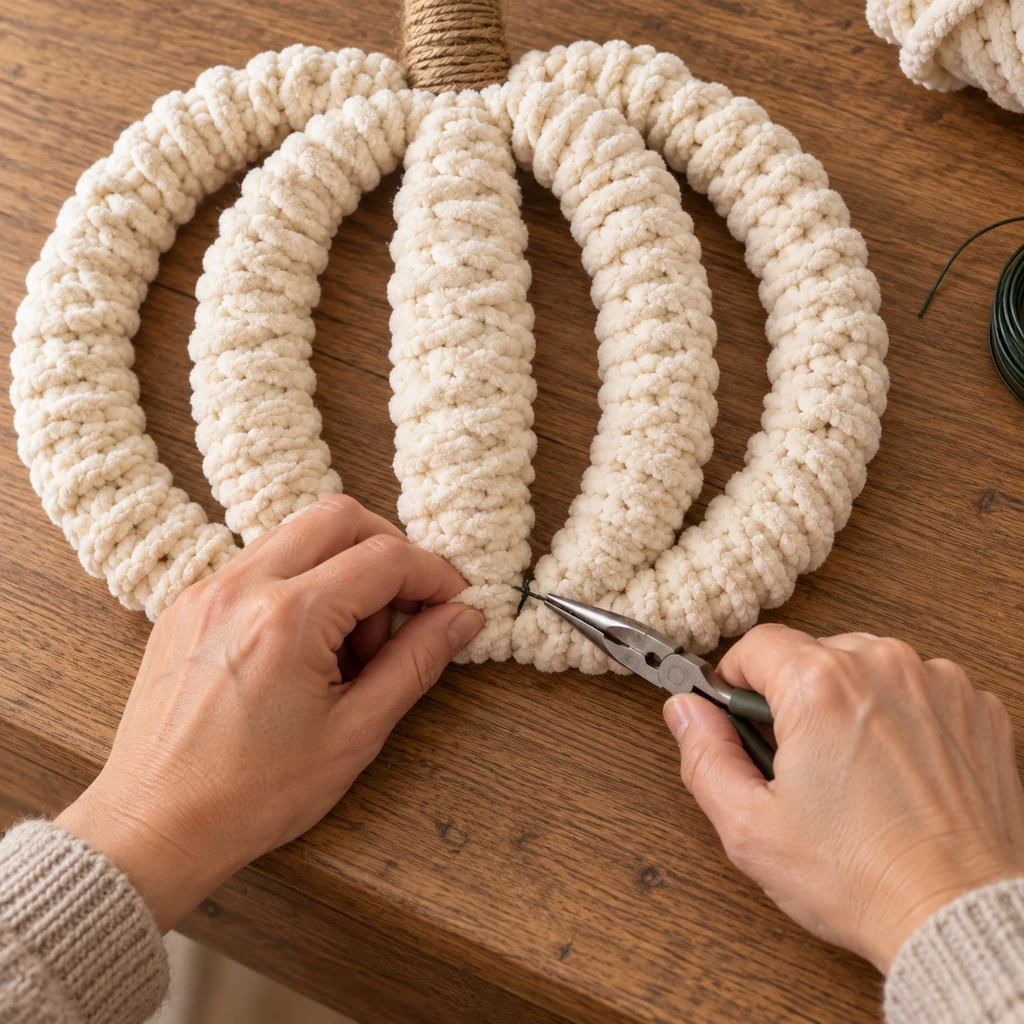
Turn the wrapped wreath face down. At every lower point where a curved rib meets the perimeter, pass a four-inch piece of floral wire beneath the yarn and around both metal wires. Twist it two or three times with pliers. Cut the excess, bend the tip inward, and hide the tie beneath the plush fibers.
These small locks carry the weight that would otherwise collect at the bottom of the pumpkin. Add a tie at an upper junction only if the wrapping wants to rotate. The goal is support, not a cage of wire, so every tie should remain short, smooth, and invisible from the front.
5. Wrap the Stem and Attach a Modest Bow
Cover the rectangular stem with jute twine, beginning at the back. Wind upward in tight rows, then return to the back and knot the ends. Shape the wired velvet ribbon into two loops with two short tails. Hold the bow and two small eucalyptus sprigs beside the stem, then secure them with one floral-wire tie around the metal frame.
Keep the decoration above the pumpkin’s widest point. A heavy floral cluster on one side can pull the form off level and hide the handmade yarn work. Before trimming the ribbon tails, hang the wreath temporarily and shorten them until they clear the center ribs.
6. Add a Hidden Hanger and Level the Wreath
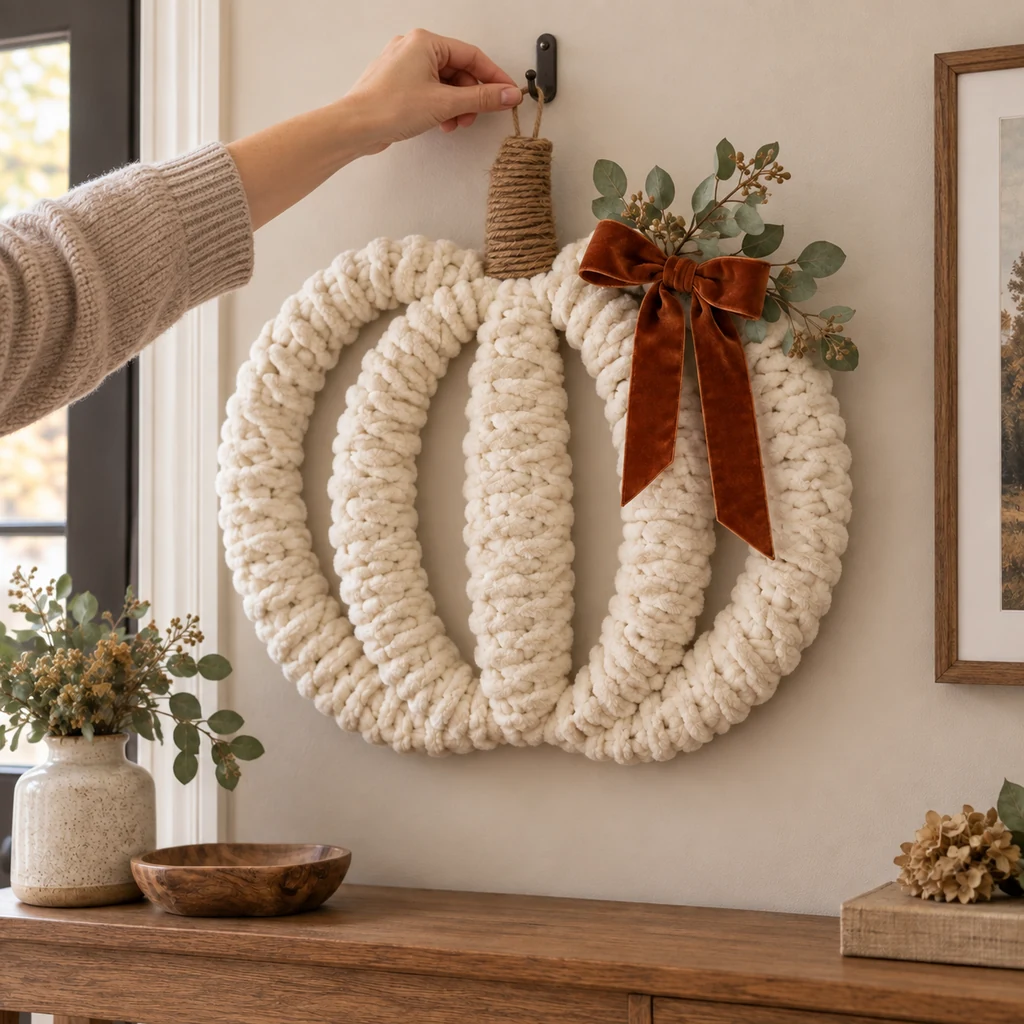
Make a small hanging loop with floral wire around the top metal junction behind the jute-wrapped stem. The loop must carry the frame itself, not a strand of chenille. Hang the wreath on a secure hook, step back, and slide the loop slightly left or right until the pumpkin sits level.
Fluff the yarn with clean fingertips, rotate any visible knots to the back, and check that every wire tip is covered. Use the wreath indoors or on a protected porch. Chenille absorbs moisture and outdoor dust, so it is not suitable for an uncovered door exposed to rain or strong sun.
Why This Method Does Not Sag
Three separate supports do the work. First, every yarn coil circles metal, so gravity cannot pull a broad woven panel downward. Second, hidden floral-wire ties stop the interior ribs from rotating at their lowest junctions. Third, the hanger is attached to the frame rather than to soft yarn.
The wreath may need light fluffing after storage, but it should not develop a low, loose belly. Store it flat in a lidded box with plain tissue between the bow loops. Do not place another wreath on top, and avoid vacuum bags that permanently compress chenille fibers.
Substitutions & Variations
- No chenille yarn: Use tubular cotton or thick wool-blend yarn. Test six inches first; scratchy fibers may be harder to slide into tidy coils.
- No velvet ribbon: A narrow linen or cotton ribbon keeps the design light. Avoid a very large burlap bow that overwhelms the stem.
- Warmer color: Replace ivory with muted terracotta, ochre, or moss, but keep all skeins in the same weight and dye lot.
- Minimal version: Leave off the bow and foliage, then finish the stem with jute alone.
- Smaller frame: Use a 12-inch form and slimmer yarn so the top junctions do not become crowded.
Common Problems and Quick Fixes
The yarn slides toward the bottom: The coils are too loose or the lower joints are not locked. Compress the wraps toward the gap and add a hidden floral-wire tie around the underlying joint.
Dark wire shows through: Push adjacent coils together before adding more yarn. A separate patch wrapped over the front usually looks thicker than the surrounding area.
The pumpkin hangs crooked: Move the hanging loop rather than weighting the lighter side with more decoration. Also confirm that the bow is attached to the frame, not pulling on one yarn-wrapped rib.
The shape looks like an apple: Keep the stem short and make sure the curved interior ribs remain visible as distinct sections. Oversized foliage can hide the pumpkin silhouette.
Where to Display It
Hang the wreath above an entryway console, on an interior door, or against a simple gallery wall where the open rib design can breathe. A neutral background shows the ivory fibers clearly, while one rust accent connects easily with wood, dried foliage, and other autumn colors.
For a coordinating tabletop project, pair it with the no-sew sock pumpkins. If you prefer natural foliage, the pressed fall leaf suncatchers use a different technique and work especially well near a bright window.
Frequently Asked Questions
Can I use hot glue instead of floral wire?
Glue may attach light decoration, but it does not replace the structural ties at the lower metal joints. Floral wire creates a mechanical connection that remains effective if the yarn shifts. If you add adhesive, follow its label and protect skin and work surfaces.
How much chunky yarn should I buy?
For an 18-inch frame, allow approximately 25 to 35 yards. Wire thickness, number of ribs, and yarn diameter all change consumption, so buy a little extra in the same dye lot rather than assuming one skein will be enough.
Can this wreath hang outdoors?
Only in a dry, sheltered location. Chenille can hold moisture and collect dust, while dyed ribbon may fade. Bring the wreath indoors during rain, high humidity, or strong wind and inspect the hanger before each season.